
In this new blog post, we will see how we can connect Elasticsearch to Python. Elasticsearch is a NoSQL Database i.e it stores data in an unstructured format. I will be using Python 3.8.5 & Elasticsearch 7.5.2.
Let’s dive in!!
Step 1: Installing Elasticsearch
You can download it easily from the official docs. Once you have run the binary, you can head to localhost:9200. You can also make a curl request via the terminal.
curl -XGET http://localhost:9200/
The output will be something like this.
{
 “name” : “2537e85ac29c”,
 “cluster_name” : “elasticsearch”,
 “cluster_uuid” : “5sC_5Eh5TeegUcF7n5GJKQ,
 “version” : {
     “number” : “7.5.2”,
     “build_hash” : “8bec50e1e0ad29dad5653712cf3bb580cd1afcdf”,
     “build_date” : “2020–01–15T12:11:52.313576Z”,
     “build_snapshot” : false,
     “lucene_version” : “8.3.0”,
     “minimum_wire_compatibility_version” : “6.8.0”,
     “minimum_index_compatibility_version” : “6.0.0-beta1”
 },
 “tagline”: “You Know, for Search”
}
Step 2: Connecting to ES with Python
For the next step, install the python client for elasticsearch using
pip install elasticsearch
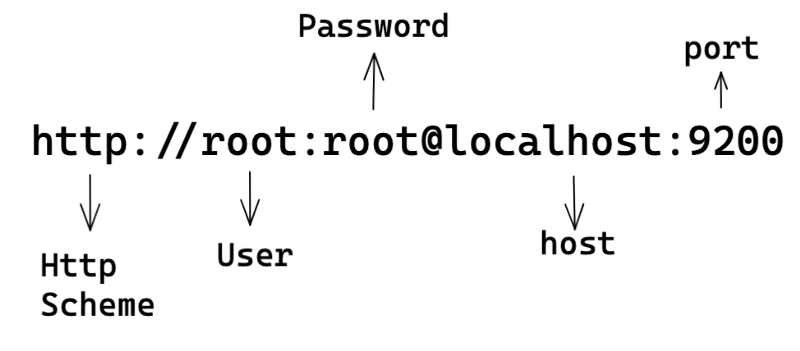
In order to connect to elasticsearch, use the following snippet.
from elasticsearch import Elasticsearch
url = 'http://root:root@localhost:9200'
es = Elasticsearch(url)
# es = Elasticsearch([{'host': 'localhost', 'port': 9200}])
Step 3: Creating Index on Elasticsearch
Let's consider an example of a retail store. A retail store will have some goods and each good will have a price associated with it. Just like we have a database schema in SQL, Elasticsearch has Mapping. The mapping is used to define the datatype of a field. In this tutorial, we will consider the following mapping, where item_name is a field of type keyword & price of type float.
mapping = '''
{
  "mappings": {
    "properties": {
      "item_name": {
        "type": "keyword"
      },
      "price": {
        "type": "float"
      }
    }
  }
}'''
Before creating the index, you can check if an index exists or not using this
index_exists = es.indices.exists(index = index_name)
Next, we will create an index retail_store.
index_name = 'retail_store'

if not index_exists:
  es.indices.create(index = index_name, body = mapping)
Once this step is done, you can head to http://localhost:9200/_all to see all the existing indexes, or can also do a curl request which will return the index mapping.
curl -XGET [http://localhost:9200/retail_store]
#output
{
  "retail_store": {
    "aliases": {},
    "mappings": {
      "properties": {
        "item_name": {
          "type": "keyword"
        },
        "price": {
          "type": "float"
        }
      }
    },
    "settings": {
      "index": {
        "creation_date": "1649414470792",
        "number_of_shards": "1",
        "number_of_replicas": "1",
        "uuid": "EMYS2SQvQbanRT4rJQyfmA",
        "version": {
          "created": "7050299"
        },
        "provided_name": "retail_store"
      }
    }
  }
}
Step 4: Adding Documents to Index
Now that we have the index created, the next step is to add documents ( similar to adding new rows in SQL).
- Adding a single document to the index
doc = {"item_name": "orange", "price": 200}
es.index(index=index_name, doc_type="_doc", body=doc)
- Adding multiple documents to the index at the same time: In cases where you want to do bulk insertion, you can use the Bulk API available in elasticsearch. The Bulk API takes an array of docs as an input
from elasticsearch import helpers

docs = [{"item_name": "apple", "price": 100}, {"item_name": "mango", "price": 150}, {"item_name": "cherry", "price": 200}, {"item_name": "litchi", "price": 250}, {"item_name": "chips", "price": 300}, {"item_name": "cream", "price": 350}, {"item_name": "plum", "price": 400}, {"item_name": "cake", "price": 450}, {"item_name": "biscuit", "price": 500}, {"item_name": "chocolate", "price": 550}]

helpers.bulk(es, docs, index=index_name, doc_type='_doc')
After running this snippet, you can check if the docs were created by
curl -XGET http://localhost:9200/retail_store/_count
# output
{"count":11,"_shards":{"total":1,"successful":1,"skipped":0,"failed":0}}
"count": 11 denotes the number of docs in the index
Step 5: Reading Documents from Elasticsearch
Once we have created a few docs, we can use queries to fetch data according to our needs. For example, we want to get the doc where the item_name is apple, we can create a query like
query = {
  "query" : {
    "bool" : {
      "must" : {
         "term" : {
            "item_name" : "apple"
         }
      }
    }
  }
}
Once we have the query, the search can be done using
results = es.search(index=index_name, body=query)
# output
{
   "took":31,
   "timed_out":false,
   "_shards":{
      "total":1,
      "successful":1,
      "skipped":0,
      "failed":0
   },
   "hits":{
      "total":{
         "value":1,
         "relation":"eq"
      },
      "max_score":0.9808292,
      "hits":[
         {
            "_index":"retail_store",
            "_type":"_doc",
            "_id":"7nLOCIABFhzSMyNPvUmZ",
            "_score":0.9808292,
            "_source":{
               "item_name":"apple",
               "price":100
            }
         }
      ]
   }
}
results[‘hits’][‘total’][‘value’] denotes the total search results, results[‘hits’][‘hits] contains all the search results whereas results[‘hits’][‘hits][0][‘_source’] contains the actual document value. results[‘hits’][‘hits’][0][‘_id’] is the document id.
By default, search queries will return only 10 hits, if you want more results, you can pass the optional size parameter when calling the search() method.
results = es.search(index=index_name, body=query, size = 1000)
Alternatively, there are also helpers.scan() method which returns all the hits by default.
helpers.scan(client=es, query=query, index=index_name)
To see the difference between search() & helpers.scan() let's try a query to return all docs where the price is greater than or equal to 100.
query = {
   "query":{
      "range":{
         "price":{
            "gte":100
         }
      }
   }
}
The results of the following query will be as follows:
Number of Search Results 10Number of Search Results with Custom Size 11Number of Search Results with Helpers Scan 11
You can check out the code for this here
Step 6: Updating Documents in Index
In case, you have a doc already existing in the index, but you want to update a particular field in the doc, you can do it with the helpers.scan()/search() & update() method in elasticsearch. Let’s take an example where we want to update the price of item_name = apple to 50.
- First, find the id of the doc that you want to update by searching for it. We will use the same query as written above.
doc = es.search(index=index_name, body=query)
- Iterate through all the hits to get the document id
for i in range(len(doc["hits"]["hits"])):
   doc_body = doc["hits"]["hits"][i]["_source"]
   doc_body = doc["hits"]["hits"][i]["_id"]

   # Once you have the id, make an update request
   doc_body["price"] = 50
   es.update(index = index_name, id = doc_body, body = {"doc": doc_body})
To see how to update with helpers.scan(), you can check the code here
Step 7: Deletion of documents
If you have the id of a particular doc you want to delete, you can simply do it by calling the delete() method.
es.delete(index = index_name, id = doc_id)
In case you want to delete documents based on some query, you can use the delete_by_query method. Here we try deleting all the documents with a price ≥ 400.
query = {
  "query": {
    "range": {
      "price": {
        "gte": 400
      }
    }
  }
}
es.delete_by_query(index = index_name, query = query)
In case, you want to delete the index itself, you can make a simple curl request like
curl -XDELETE http://localhost:9200/retail_store
This was all about CRUD operations with elasticsearch in python. The entire code is available on Github.
Comments
Join the discussionNo comments yet. Be the first to comment.
